Sudoku Tip: Avoiding The “Deadly Rectangle”
This is a cool tool that every sudoku fan should use. It’s not just for advanced or expert puzzles. Anytime you get stuck in a sudoku puzzle, you should start looking for DEADLY RECTANGLES. This is also called UR (for unique rectangle) depending on what you’re reading.
There are several sudoku solving strategies that involve avoiding the dreaded DEADLY RECTANGLE. Three of these techniques are the UNIQUE CORNER, the UNIQUE SIDE, and the HIDDEN RECTANGLE (as well as many others). These are much easier to spot than X-wings, Skyscrapers, etc and should be included in every sudoku worker’s tool box.
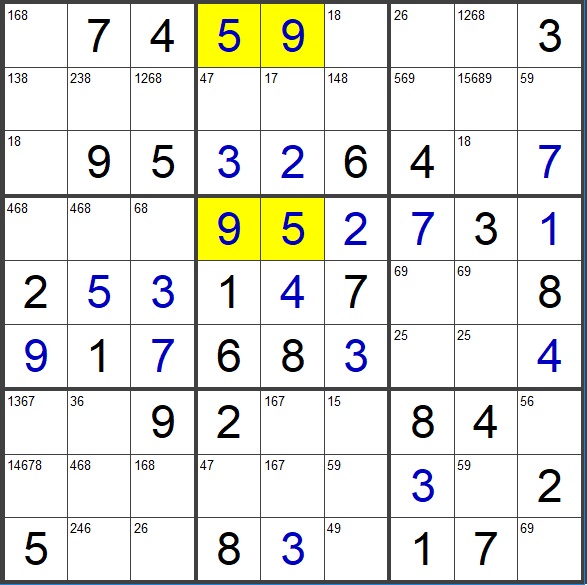
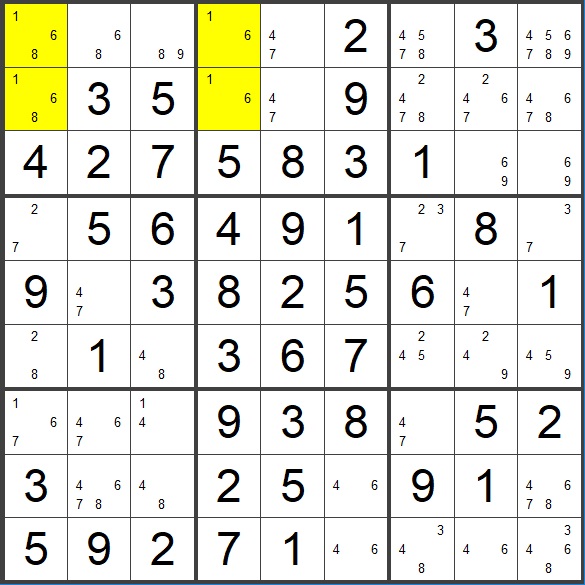
A DEADLY RECTANGLE exists when four identical bivalue cells (cells which contain only two candidates) are arranged in a rectangle. Those four cells must share two rows, two columns, and two boxes (don’t forget the two boxes! More on that later). Figure 1 illustrates a Deadly Rectangle.
Figure 1 A Deadly Rectangle
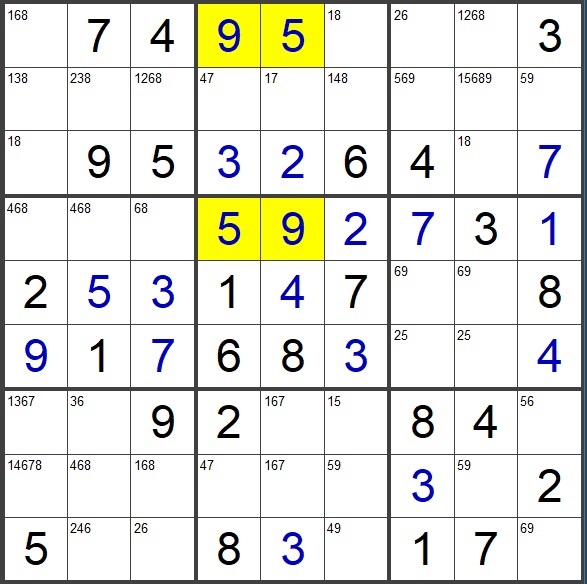
When you examine this puzzle, you will find that there is no way to eliminate a 5 or a 9 from any of the yellow cells (try it!). This means that there are two possible solutions (possibly more than two!).
|
|
|
A true Deadly Rectangle can only exist in invalid puzzles (valid sudoku puzzles must have one unique solution). The puzzle shown above is indeed an invalid sudoku puzzle. It has at least two solutions.
So you should never encounter a deadly rectangle when working a valid sudoku puzzle. If you see a potential deadly rectangle, you can eliminate any candidate that completes the deadly rectangle. There are many solving strategies that employ this logic.
The Unique Corner Strategy
The first solving strategy that avoids deadly rectangles is called the UNIQUE CORNER. It is the easiest to spot and is a very useful tool. If you don’t learn anything else in this article, just learn the UNIQUE CORNER. I promise it will be very useful.
The UNIQUE CORNER consists of three identical bivalue cells in a rectangular fashion. The remaining corner of the rectangle (the “unique corner”) must contain both of the bivalue candidates plus one or more extra candidates. The four corners of the rectangle must be contained in just two boxes. The yellow cells in figure 4 are contained in two rows (rows 3 and 8), two columns (columns 8 and 9), and two boxes (boxes 3 and 9).
Figure 4 Unique Corner
If you examine the four yellow cells, there is potential for a deadly rectangle. This is called a UNIQUE CORNER. Three of the four corners are identical, one corner is unique (the 238 cell in row 3 column 8). When you consider the three possible values for that cell, placing a 2 or an 8 in that cell would complete a deadly rectangle. Said another way, if you eliminate the 3 in that cell, a deadly rectangle is created. Since we know that this is a valid sudoku puzzle, a deadly rectangle is not possible. (If you do place a 2 or 8 in that cell, you will encounter a dead end before solving the puzzle as shown in figure 7). Therefore you can eliminate the 2 and the 8 from that cell.
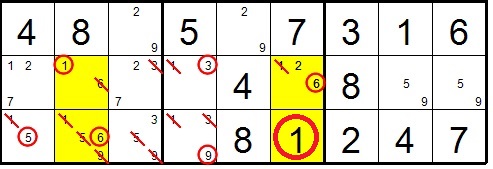
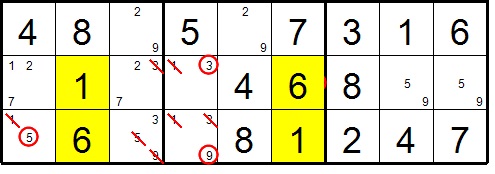
Figures 5 and 6 show the puzzle after arbitrarily assigning a two or eight to the unique corner. The four cells are no longer bivalue. But it should become obvious that the candidates in those four cells can be swapped without causing any conflicts. There is no way to eliminate a two or eight from any of the four cells. If you continue to attempt to solve the puzzle, you will encounter a dead end.
|
|
|
Figures 5 and 6
Figures 5 and 6 still represent a deadly rectangle even though the four cells are no longer bivalue cells. In figure 5, an eight was arbitrarily placed in the unique corner. In figure 6, a two was placed in that cell. In either case, if you continue to attempt to work the puzzle, you will encounter a dead end (the pink cells have no possible values).
Therefore, candidates 2 and 8 can be eliminated from the cell at row 3 column 8.
Caution: When searching for a potential deadly rectangle, it is important to remember that the four involved cells must be CONFINED TO TWO BOXES! In figure 7, this looks like it could be a unique corner situation.
Figure 7 False deadly rectangle
This resembles a unique corner situation. It is tempting to eliminate the 5 and 9 from the cell at row 4 column 1. This would be a mistake. Placing a 9 in that cell would not complete a deadly rectangle. In fact, that cell is really a 9 in the solved puzzle. It is not a deadly rectangle because the four cells are located in four different boxes. A deadly rectangle consists of four identical bivalue cells confined to two rows, two columns, AND TWO BOXES!
The Unique Side Strategy
There are many solving techniques that utilize the deadly rectangle. The unique corner is the simplest of them. Now, check out the UNIQUE SIDE. (see figure 9) It is a bit more complicated than the unique corner but it's worth exploring.
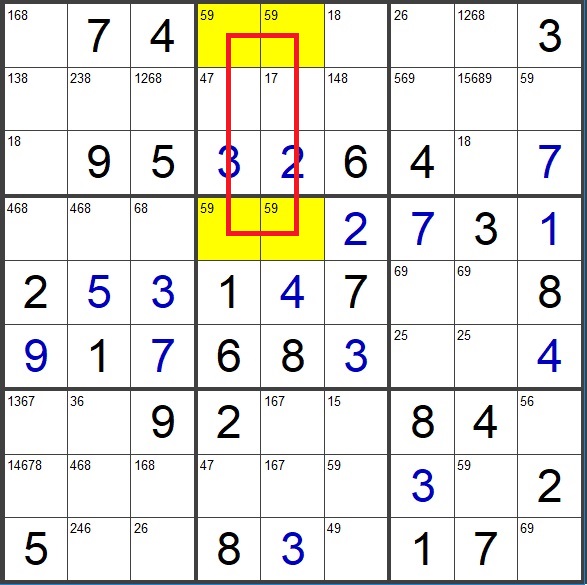
Figure 9 Unique Side
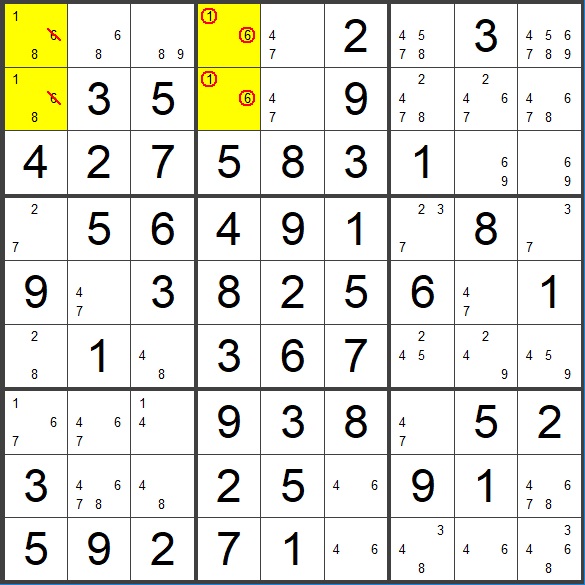
One side of our potential deadly rectangle is complete (the two yellow cells in column 4). The following may sound confusing at first but bear with me, it’ll make sense with an example. The unique side technique is, “Of candidates X and Y, if either is strongly linked on the non-unique side, the other candidate can be eliminated.'' Whew! That’s a mouthful! What does it mean?
X and Y are defined by the “completed” side of the rectangle (column 4, box 2 in this case). X = 1, Y = 6. Now we focus on the “other” side of the rectangle (the “non-unique side”, column 1. We want to see if either candidate is strongly linked. (Strongly linked means that there are only two of them, one must exist, the other cannot). The strong link can exist in the box or column. So we have four chances to find a strong link.
So now we look for four possibilities.
The strongly linked ones in box one is the key. One of those yellow cells in box one must be a one. If we place a six in either cell, the other becomes a one. This would complete the deadly rectangle. Therefore, both 6’s can be eliminated.
So once again, here is the rule: “Of candidates X and Y, if either is strongly linked on the non-unique side, the other candidate can be eliminated.'' Since the ones are strongly linked, the sixes can be eliminated. Cool, eh!
Figure 8 Unique Side
The Hidden Rectangle Strategy
Another way to avoid the deadly rectangle is using the HIDDEN RECTANGLE strategy.
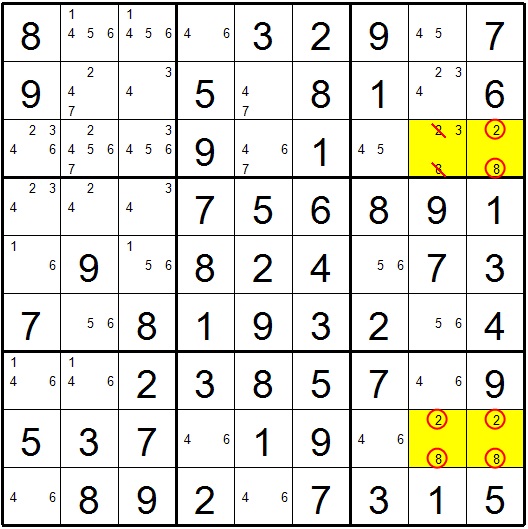
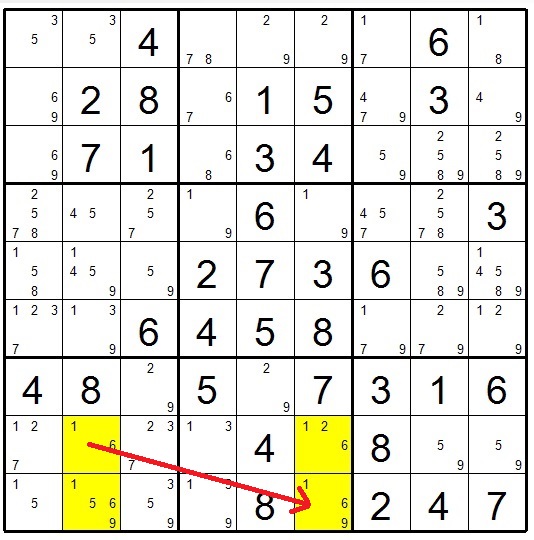
Figure 9 Hidden Rectangle
This doesn’t qualify as a Unique Corner or Unique Side because there is only one bivalue cell . However, it still has the potential to become a deadly rectangle. One of the four corners must be bivalue. Those two candidates (16) must also be present in the other three cells. In this example it is the 16 in row 8 column 2. The Hidden Rectangle strategy examines the cell diagonally opposed to the bivalue cell. In this case, it is the 169 in row 9 column 6.
At this point we can consider two possibilities:
(these are the values (16) from our bivalue cell)
What if that cell is a 6?
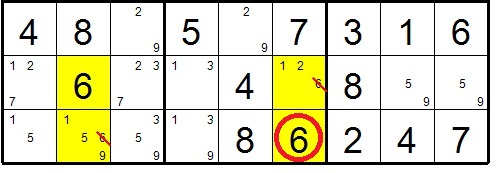
Figure 10 “Try a 6”
If we place a 6 in row 9 column 6 (circled), it will remove the 6 from the cell above it as well at the cell at row 9 column 2. This will force our bivalue cell (row 8 column 2) to also become a 6 (it’s the only 6 left in row 8). But the two remaining cells (12 and 159) are of no help. They aren’t forced to become 1’s. Therefore placing a 6 here doesn’t force a deadly rectangle. Time to try something else.
What if that cell is a 1?
Figure 11 “Try a 1”
This looks like a mess but bear with me. It’s not as complicated as it looks. If our cell at row 9 column 6 is a 1 (big circle), many things occur. First, if forces the 6 above it (it is the only remaining 6 in that column). This forces the bivalue cell to become a 1 (small circled 1).
The final cell (row 9 column 2) is 1569. The 6 in row 9 column 2 is the only possible location for a 6 (ie. it is a hidden single in the box). Also the 1,5, and 9 can be removed from that cell making it also a naked single. We now have a deadly rectangle. Therefore, that cell (big circle) cannot be a 1.
Figure 12 Deadly Rectangle
Figure 13 Deadly Rectangle
The point is this: Placing a 6 in row 9 column 6 did not create a deadly rectangle (in fact, that cell really is a 6 in the correctly solved puzzle). But placing a 1 in that cell did create a deadly rectangle. Therefore, that cell cannot be a 1 and it can be eliminated.
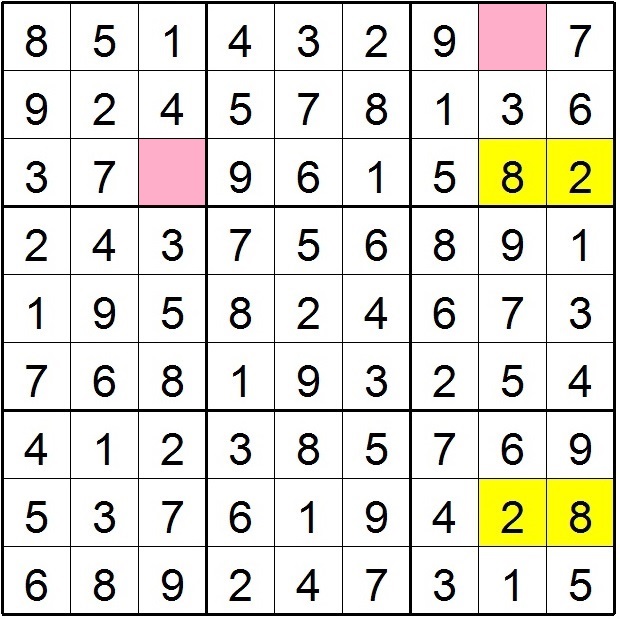
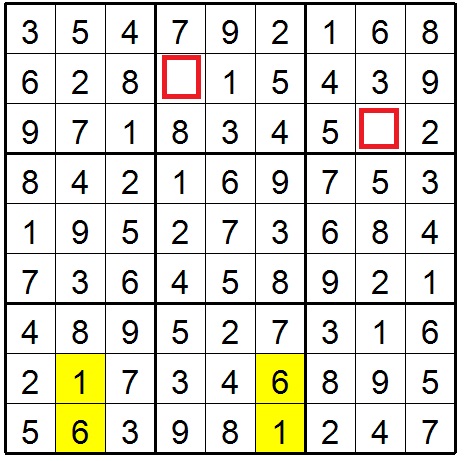
If you did enter a 1 in row 9 column 6, you would encounter a deadly rectangle and would not be able to solve the puzzle. You would reach a dead end as shown in figure 14.
Figure 14 Two dead end cells
The three strategies just described are part of a large collection of strategies that involved the deadly rectangle. It’s even possible to look for a deadly rectangle when none of the four involved cells are bivalue. Just remember, anytime you see a potential deadly rectangle, any move that completes the deadly rectangle is wrong.
I invite your comments. You can email me at jumpindoc@gmail.com
Happy puzzling!
John